Spring AOP 源码结构梳理分析
前言
学习源码更多的是学习源码的设计,并不像学习应用那样快速上手。
应用学习有练习有反馈,学习起来并不会感觉到枯燥感,但是源码学习就枯燥多了。
源码并不能让你写出一段代码来,只能通过阅读调试等方式去理解别人的代码和设计思路,难度可想而知。
Spring AOP 学习路径
Spring AOP 的源码学习是需要我们层层递进,或者是拆解学习,然后才是整体的一个理解。
学习源码不要想着一步到位,也不要想着一遍就会,不要有焦虑的情绪,逐步的学习会让你逐渐理解原先不懂的知识。
Spring AOP 主要包含
- Spring AOP 的应用(上一篇文章提过一下,也简单说明了源码的原理)
- Spring 注解切面的解析,将业务代码解析生成一个个切面便于织入
- Spring AOP 织入,使用动态代理将切面和目标代码整合在一起
- Spring AOP 的调用,当目标代码调用时怎样执行相应的切面
Spring AOP 拆解成这几个步骤进行学习,逐步理解,最后整合。这篇文章主要分析后三个步骤:解析、织入、执行
Spring 切面的解析
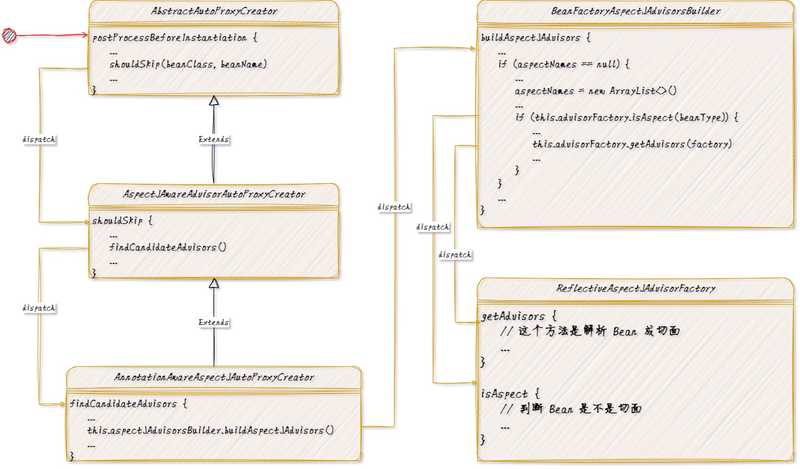
这里分析的主要时注解形式的切面,所以需要学习的类是 Bean 后置处理器:AnnotationAwareAspectJAutoProxyCreator
Spring 切面解析对应的切入点是 Bean 后置处理器的方法:postProcessBeforeInstantiation,该方法会在 Bean 创建实例化之前。实际上切面的解析操作只会在第一个 Bean 实例化之前执行,后续的 Bean 创建虽然调用该方法,但是都是从缓存中拿去切面,意味着是切面解析只会执行一次。
描述整个过程中的关键点
- 类
AnnotationAwareAspectJAutoProxyCreator完成 AOP 的解析 - 以
AnnotationAwareAspectJAutoProxyCreator继承AbstractAutoProxyCreator的方法postProcessBeforeInstantiation作为 Spring 扩展点入口 - 执行到方法(
postProcessBeforeInstantiation)中的代码:shouldSkip(beanClass, beanName)时会调用具体实现类AspectJAwareAdvisorAutoProxyCreator的实现 - 执行到方法(
shouldSkip)中的代码:findCandidateAdvisors()时会调用具体实现类AnnotationAwareAspectJAutoProxyCreator的实现 - 执行到方法(
findCandidateAdvisors)中的代码:this.aspectJAdvisorsBuilder.buildAspectJAdvisors()时执行注解 AOP 的解析工作 - 在方法
buildAspectJAdvisors中会有一个属性aspectBeanNames作为缓存标识,只会在第一次执行该方法时解析注解切面 - 遍历所有的 Bean,将切面(有注解
@Aspect的 Bean)执行this.advisorFactory.getAdvisors(factory)解析切面内的所有通知并排序
大体上的解析流程就是这样,理解整体流程,剩余的细节就需要自己查看源码了。例如具体的通知解析逻辑、是否是切面的判断、切面排序、默认切面(后续执行时都会使用到)等等
Spring AOP 代理的创建
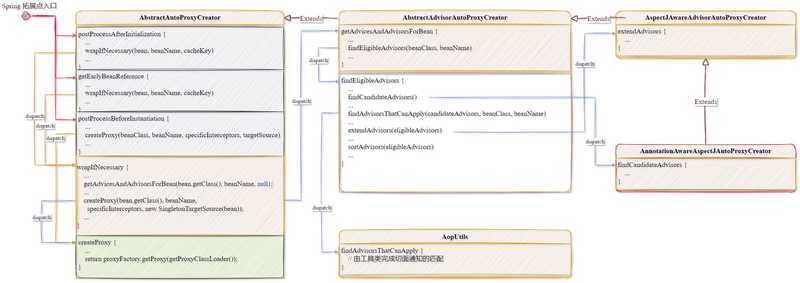
AOP 代理的创建涉及的类还是 Bean 后置处理器:AnnotationAwareAspectJAutoProxyCreator,不同的是 Spring 拓展点,即对应的入口方法不同
AOP 代理的创建不止有一个入口,所以先单独提出来说一下 AOP 创建动态代理的入口
- 以
AnnotationAwareAspectJAutoProxyCreator继承AbstractAutoProxyCreator的方法postProcessAfterInitialization作为 Spring 扩展点入口。这是普通 Bean 创建 AOP 动态代理的入口 - 以
AnnotationAwareAspectJAutoProxyCreator继承AbstractAutoProxyCreator的方法getEarlyBeanReference作为 Spring 扩展点入口。这是出现循环依赖是 Bean 创建 AOP 动态代理的入口 - 以
AnnotationAwareAspectJAutoProxyCreator继承AbstractAutoProxyCreator的方法postProcessBeforeInstantiation作为 Spring 扩展点入口。这是针对TargetSource创建 AOP 动态代理的入口
以上是 Spring AOP 创建动态代理的几个拓展点位置。接下来就是具体创建 Bean 关于 AOP 的动态代理的整体逻辑了。
- 从 Spring 拓展点到创建 AOP 动态代理分两种
- 在入口方法(
postProcessAfterInitialization、getEarlyBeanReference)执行到代码:wrapIfNecessary(bean, beanName, cacheKey) - 在入口方法(
postProcessBeforeInstantiation)优点特殊,不是通过执行方法wrapIfNecessary的方式,而是绕过了wrapIfNecessary方法调用直接执行代码createProxy(beanClass, beanName, specificInterceptors, targetSource)去创建动态代理
- 在入口方法(
- 在方法(
wrapIfNecessary)执行到代码:getAdvicesAndAdvisorsForBean(bean.getClass(), beanName, null)时会调用具体实现类AbstractAdvisorAutoProxyCreator的实现来获取需要织入的通知(切面) - 在方法(
getAdvicesAndAdvisorsForBean)执行到代码:findEligibleAdvisors(beanClass, beanName) - 在方法(
findEligibleAdvisors)执行到代码:findCandidateAdvisors()时会调用具体实现类AnnotationAwareAspectJAutoProxyCreator的实现来获取所有有效的通知 - 在方法(
findEligibleAdvisors)执行到代码:findAdvisorsThatCanApply(candidateAdvisors, beanClass, beanName)从所有通知中筛选出有效的通知 - 在方法(
findAdvisorsThatCanApply)执行到代码:AopUtils.findAdvisorsThatCanApply(candidateAdvisors, beanClass)交给工具类完成筛选工作 - 在工具类 (
AopUtils)中最后会来到org.springframework.aop.support.AopUtils#canApply(org.springframework.aop.Pointcut, java.lang.Class<?>, boolean)由 AspectJ 完成完成初筛(类匹配:pc.getClassFilter().matches(targetClass))和精筛(表达式匹配:methodMatcher.matches(method, targetClass)) - 筛选出合适的通知后回到方法(
findEligibleAdvisors)执行到代码:extendAdvisors(eligibleAdvisors)时会调用具体实现类AspectJAwareAdvisorAutoProxyCreator的实现补充一个通知(ExposeInvocationInterceptor)用于执行时递归调用各个通知 - 在方法(
findEligibleAdvisors)执行到代码:sortAdvisors(eligibleAdvisors)来对通知集合排序,方便执行时递归调用(责任链模式) - 获取到合适的通知集合后回到(
wrapIfNecessary)执行到代码:createProxy(beanClass, beanName, specificInterceptors, targetSource)会执行具体的动态代理创建(由 CGLIBCglibAopProxy或者 JDK,具体的可能会受配置影响如:proxyTargetClass)
配合一张图以作理解
Spring 通知调用
因为被织入通知的 Bean 会有动态代理的存在,当 Bean 被调用时将会由动态代理完成相关通知的调用。
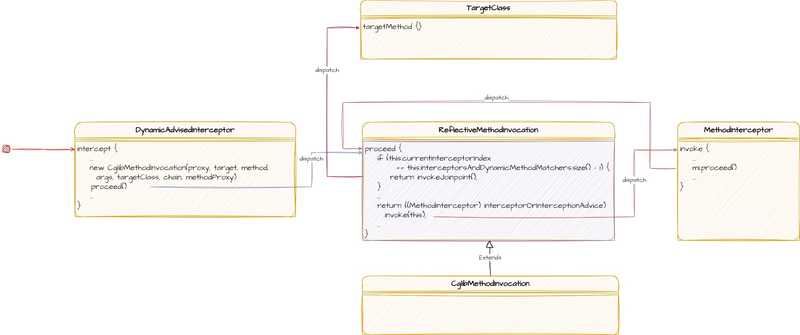
这里以 CGLIB 的动态代理举例,所以创建的动态代理是类 CglibAopProxy.DynamicAdvisedInterceptor。
- 在动态代理的
intercept方法执行到代码:new CglibMethodInvocation(proxy, target, method, args, targetClass, chain, methodProxy).proceed()时会调用其父类ReflectiveMethodInvocation的实现正式开始调用相关通知 - 在方法(
ReflectiveMethodInvocation.proceed)执行到代码:((MethodInterceptor) interceptorOrInterceptionAdvice).invoke(this)调用第一个通知(ExposeInvocationInterceptor)并将this--CglibMethodInvocation的调用者传入 - 在第一个通知的方法(
ExposeInvocationInterceptor.proceed)执行到代码:invocation.set(mi)向本地线程变量设置MethodInvocation(调用者CglibMethodInvocation) - 在第一个通知的方法(
ExposeInvocationInterceptor.proceed)执行到代码:mi.proceed()继续执行调用者CglibMethodInvocation的proceed()方法取出下一个通知并调用 (((MethodInterceptor) interceptorOrInterceptionAdvice).invoke(this)) - 直到在方法(
CglibMethodInvocation.proceed)执行到代码:invokeJoinpoint()调用真正的目标方法
所有的通知都是由调用者 CglibMethodInvocation 通过方法 proceed 完成逐个调用,具体的通知会封装成MethodInterceptor 的实现(MethodBeforeAdviceInterceptor、AroundInterceptor 等等)方便统一执行调用。
总结
整体上 Spring AOP 的流程就是这样,具体的还有很多细节就不再这里展开分析。源码的学习还是需要从浅入深从初略到细节,才不会那么枯燥。经过这一篇文章的讲解,应该说 Spring AOP 的源码学习才正式入门了,后续的细节可以自己以翻阅源码或者断言调试的方式进行学习。


